Thursday, January 15, 2015

Tacking and Jibing...The Science to Turning a Sailboat - Part 2 - Jibing

We are now on our way back from out upwind destination that we reached a few days ago. Since winds we experienced before are the prevailing winds, they are essentially the same today. 

If we have to turn while we are going downwind we will have to jibe. While there are some similarities, there are also some differences we have to deal with while jibing. Like tacking, there are two types of tacks, a port tack and a starboard tack. A port tack, like before, can be remembered as the wind hitting the boat on the port side. Likewise, a starboard tack can be remembered as the wind hitting from the starboard side. 

Jibing can look from the outside to be a little more violent than tacking. One of the biggest things that the crew has to watch out for is the movement of the boom. While jibing, the helms person should be in complete control of what is happening. 

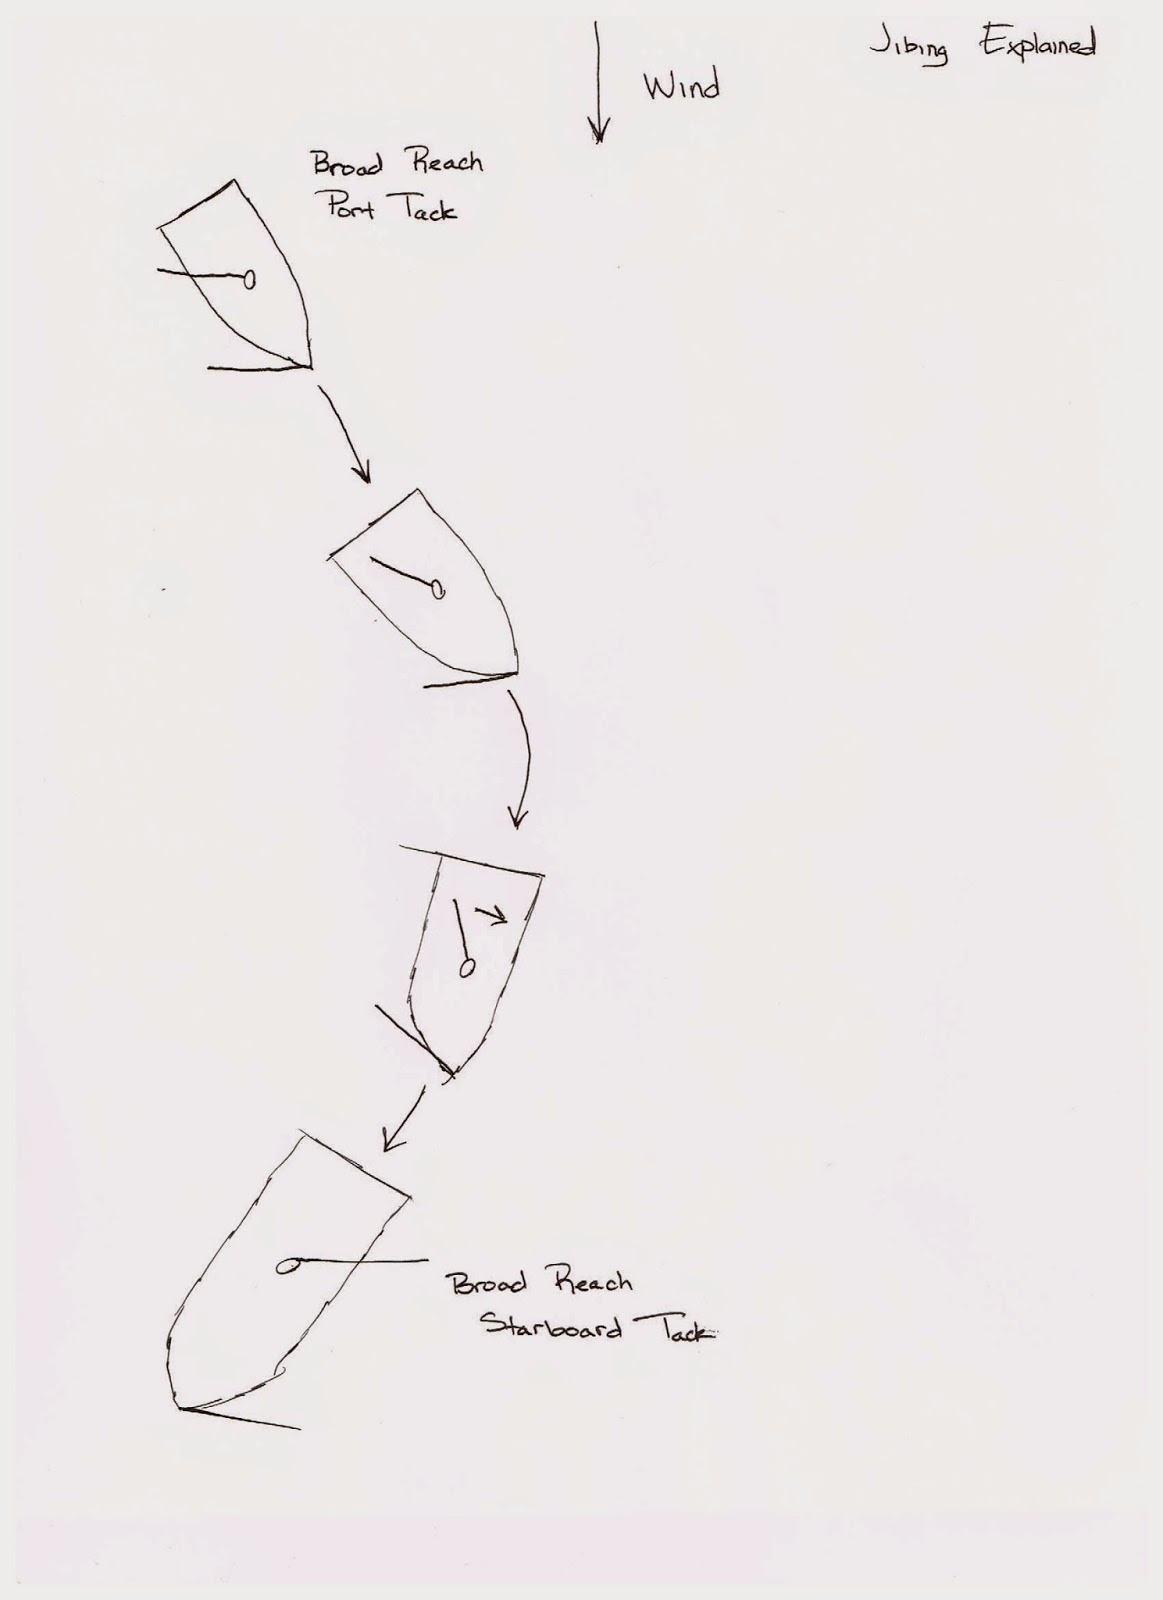
If you take a look at my drawing below, you will see four boats. I will use each of these to describe what will happen at each moment. The top most boat will be position 1 and the bottom most will be position 4. 

To keep everybody safe, the helms person is going to use a few key phrases to prepare everybody for what is happening. In position 2, the helms person will shout "prepare to jibe". At this time the crew will trim in the main most of the way and get it mostly centered on the boat. This will stop the boom from swinging too violently across the and causing problems. (While tacking, the boom will swing across but it will move pretty slowly. When jibing, the boom will move very quickly.) Once the main is trimmed, the crew will say "ready". Once ready, the helms person will start to slowly turn the boat and say "Jibe-O" as seen in position 3. When the crew starts to see the main jibe, they will release the sheets and allow the boom to go back out to where it needs to be as shown in position 4. 

The jib can now be adjusted. The crew will release the jib sheet and trim on the opposite side. 


Tuesday, January 13, 2015

Tacking and Jibing...The Science to Turning a Sailboat - Part 1 - Tacking

To power boaters, sailing is something that we all try to stay away from. Those who sail say that once you go sail you will never go back to the "other side" of power. Sailing requires much more thinking and tactical maneuvering than power boating does. After all, every move that you make is dependent upon mother nature.

One think that always has confused me is turning a sail boat. If you turn too slowly you will stall out. If you turn too quickly, something bad could happen. The key to sailing is to keep everything as controlled as possible. Have you ever watched the America's Cup or any other big sailboat race? If you look closely and listen to what is happening on the boat, it could definitely be considered controlled chaos. When it comes time to turn the boat to stay on the course, it takes the entire crew to control the boat and make sure that it is back on its desired course as efficiently as possible. 

While under sail power, there are two terms used for turning. One term is used when sailing up wind (into the wind) and the other is used when sailing down wind (with the wind). 

Tacking: This is the term used when sailing into the wind. Like we learned earlier, we cannot sail directly into the wind. Therefore, if our destination is directly up wind, we must tack back and forth until we reach our destination. (Figure 1) Inside the idea of tacking, there are two types of tacks, a port tack and a starboard tack. A starboard tack is when the wind is hitting the sails from the starboard side, or the right side. A port tack is when the wind is hitting the sails from the port side, or the left side. (Figure 2)

When tacking, boat speed is important. If you are not moving fast enough you may stall too close to the wind and find yourself at the dreaded point of sail called "the irons." If you find yourself at this point of sail stop and think about how a boat will move in reverse. When a boat is "in irons" it will begin to move backwards. If you are backing up, which way will you turn the rudder to turn the boat in a desired direction? Using that mind set, use the wind to push you backwards (like you are in reverse at the dock) and turn the bow so that is is pointing in the new desired direction. (Figure 3)

Please excuse my lack of drawing skills. But I believe pictures is the best way to understand this concept, I know that is what helped me learn. 

Figure 1


Figure 2


Figure 3

Be sure to tune in to see the other half of the science, jibing. Until then, may the winds always be in your favor!

Wednesday, January 7, 2015

Winter Activities

With winter in full force many of us unable to go out and enjoy the water, now is a great time to get some of those activities that we all dread done. I know that waxing is one of my least favorite things to do but its something that must be done in order to keep your hull looking in like-new shape and protect it from anything that may try to hurt it.

There are hundreds of different types of waxes on the market that try to prove that they are the best. Others try to persuade us that they only need to be used once a year to keep that pristine shine. When it comes down to it, there are some that are good and then there are some that are better. Nothing is going to completely stand out from the rest. 

My favorite are paste waxes. I like these because they do not drip or run like liquid waxes. One brand that does not get much recognition is Collinite. Collinite has been abound since the 1930s and has only one thought when it comes to creating products, create products that are by far the best in the industry. 

Collinite wax must be treated a little differently. When you are going to use a superior product you need to use it in a much more careful way. Collinite is not like other waxes where it has to be piled onto the surface to be effective. When reading their instructions, it is stated that they layer must be thin. Not only does this make it easier to use but it also makes the removal of the wax after it dries much easier. 

Before applying the product you must first look at the surface that you are dealing with. It is very important that the hull was just washed and dried and is free of any debris that may scratch the surface. If you notice any stains or oxidation, these must be removed first so that they are not trapped under the layer of wax. To clean these spots, Collinite reccomends using their "No. 920 Fiberglass Boat Cleaner." This will clean the surface and allow the wax to better adhere to the hull. 


After the surface has been prepared, you are now ready to apply the first and only coat of wax. Collinite reccomends to only apply wax in a 2 x 2 square. Collinite "No. 885 Fleetwax Paste" is the paste wax that they produce. Machine applications are acceptable but strongly discouraged unless you are very proficient with buffer and know how it will react with the surface. 


To keep things simple simply apply the wax with a round applicator pad and then remove with a micro fiber cloth once it begins to dry. Take your time and move around the boat slowly and you will be finished before you know it. 


Thursday, January 1, 2015

Happy New Year


Happy New Year everybody. I hope that this year is full of new destinations and calm seas.

May the winds always be in your favor!


Cruise Fireworks Ocean

Thursday, December 25, 2014

Merry Christmas!


I would just like to wish everyone merry and safe Christmas Day! I hope everyone has a great time with those that they love!

Wednesday, December 17, 2014

Marker One Pontoons

Marker One is the newest name in boats. It is a offspring company of one of the top builders in pleasure boats, Cobalt. With a name like Cobalt standing behind the product, you know that this is going to be a sound product. Marker One is a producer of high-end tritoons that sport many key characteristics of the boats by its parent company.

Click here to read the news article.


Wednesday, December 10, 2014

Points of Sail

Who ever invented sailing didn't think things through completely. They didn't make the boats able to sail in all directions. Apparently you can't sail directly into the wind. Well, hold on, how am I suppose to get to where I'm going if it directly upwind? If you hadn't caught it yet, this was sarcasm, one of my greatest qualities. 

I'll explain getting to upwind destinations next, but first we need to find out where we actually can sail. Imagine looking down at a sailboat from up in the air. There will be a big circle around the sailboat. At each point around this circle there is a point of sail, except directly into the wind and a given number of degrees around the wind direction depending on the boat. Boats that are meant for high performance will be able to sail "closer to the wind." Those that are considered boats for simple cursing will not be able to sail in the same directions. Sailing is all about angles and the angle that the wind is hitting the boat. 

The first diagram simply shows where you can sail and where you cannot sail. Remember, the depicted "no sail zone" is always different. Different boats have different areas where they can and can't sail. 


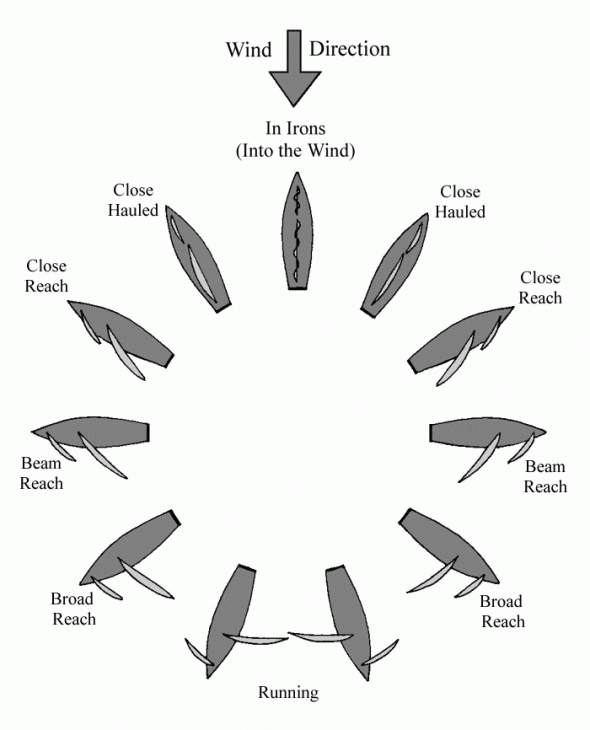
Now that we have determined where we can't sail, lets explore the area where we can sail. Each point of sail has a specific name. The name depends on the angle at which the wind is hitting the sails.

This is a diagram of the various points of sail. From this graphic, you can also see where the most efficient sail positions are relative to the wind. To the untrained eye, it would look like "running" is would be the fastest point of sail. Actually, a beam reach is the fastest point of sail.

Wednesday, December 3, 2014

Parts of a Sail

So since we are starting at the very beginning with the whole idea of sailing, we have to learn the parts of the boat. As far as basic boating terminology goes, that all remains the same (i.e. bow, stern, port, starboard). Its sailing specific things that need to be taught in order to completely learn the sport. Remember, I am learning along with everybody else. What better time than during the off season to learn something that can be used next season?

This graphic shows the basic parts of the sail. Previously, we learned about the two most common types of sails. Now, we need to learn about the parts of the sails. Trust me, later on they will become relevant.


So think of this as a look from the starboard side to the port side. The stern is to the left and the bow is to the right. Since we are beginners, the vertical component is the mast (red) and the horizontal component is the boom (green).

When I learn new things, I like to water them down and take just the basic idea. There can be technical definitions for these, but lets just look at the terms in their most basic form.


  • Clew - the bottom most, stern most corner of the sail. 
  • Foot - the bottom edge of the sail
  • Tack - the corner that is between the end of the bottom of the mast and the beginning of the boom. (closest to all the action)
  • Luff - the edge that runs vertically along the mast
  • Head - the top corner where the sail attaches to the mast
  • Leech - the rear edge of the sail, farthest away from the mast

Thursday, November 27, 2014

Happy Thanksgiving!

Happy Thanksgiving everybody! I hope everyone has a safe and enjoyable holiday!


Friday, November 14, 2014

The United States of Boating Infographic

I would like to give a huge thanks to Boat Ed for creating and sharing this graphic. It is a great overview as to what the boating community looks like in the United States.

United States of Boating